Like many programmers out there, sometimes I have a problem, and I just go and solve it. And often it does not strikes me that I might not be the only one. Or it does, but I discard it as obvious and trivial, and not worth sharing :-)
This is one of those, and I have to thank Mike Ryan for giving me the push to share it.
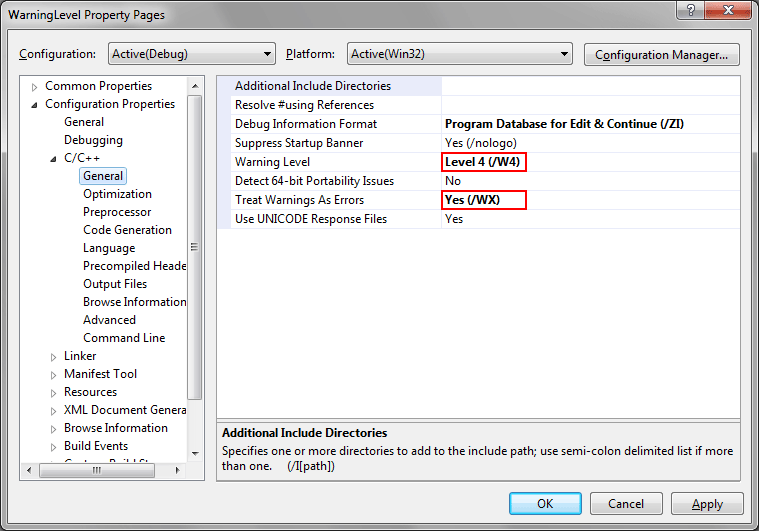
Once in a while I create new projects using the Visual Studio wizards. Then one of the first think I do is go and change the “Warning Level” to 4 (default is 3) and change “Treat Warnings as Errors” to Yes (default is No).

So at some point I got tired of it and I said to myself: what if the wizards would create my projects with those settings by default?
After a quick investigation I have discovered where that setting is: in some of the JavaScript files under the <VSInstallBase>\VC\VCWizards\ folder, and it looks like this:
CLTool.WarningLevel = WarningLevel_3;
From here it was just a step to figure out how to change it: global search replace WarningLevel_3 with WarningLevel_4.
You can use any tool that can do search-replaces in files, but because you already have Visual Studio installed, why not use it?
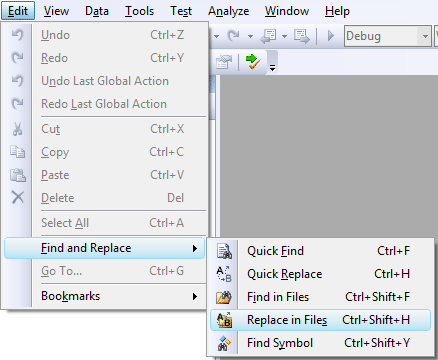
So go to “Edit” – “Find and Replace” – “Replace in Files” (or Ctrl+Shift+H if you use the default “Visual C++ 6” keyboard mapping scheme).

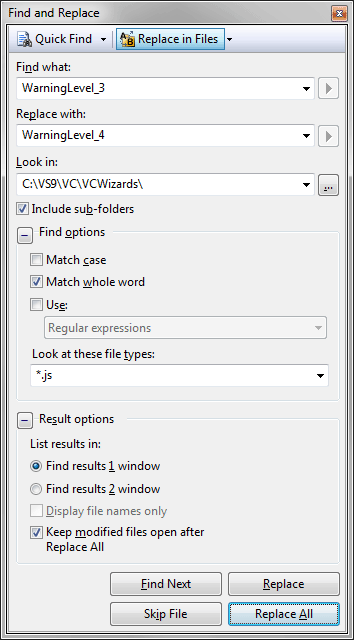
Then set the various fields:
- Find what:
WarningLevel_3 - Replace with:
WarningLevel_4 - Look in: the location of your
<VSInstallBase>\VC\VCWizards\folder (I usually install Visual Studio close to the root of the disk, not in Program Files). Change it to match your setup. - Find options: check “Match whole word” (not mandatory though, there are no other instances).
- Result options: check “Keep modified files open after Replace All”

After you click the “Replace All” button you will see a quick progress dialog followed by the report that all is done.
The “Find Results 1” panel will contain the report of all the changes,

and the files are still opened and not saved, so you can check them (clicking on lines in the “Fined Results 1” panel will take you right where things happened).
If all is nice and dandy, you can go to “File” – “Save All” (Ctrl+Shift+S), then “File” – “Close Solution.”
Of course, if you trust me, yourself, and Visual Studio, then you don’t check “Keep modified files opened after Replace All” and you don’t have to check and save anything :-)
But wait, where is the “Treat Warnings as Errors” change?
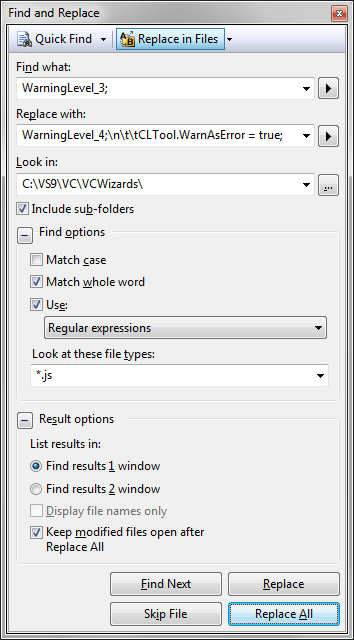
Here it is:
- Find what:
WarningLevel_3;(note the semicolon) - Replace with:
WarningLevel_4;\n\t\t\tCLTool.WarnAsError = true; - Look in: unchanged
- Find options: as before, and also check “Use” – “Regular expressions” (to properly interpret the
\nand\t) - Result options: unchanged

Ok, this is it!
But (of course) you don’t have to stop here. You can continue digging in the VCWizards subfolders and change other things.
But remember: this is not officially supported (in fact all JavaScript files have a signature block at the end), so it can stop working at any time, and any Visual Studio patch or Service Pack can override it, or start using the signature to validate the content.

[…] http://mihai-nita.net/2010/05/10/changing-default-vs-warning-level/ […]